I recently tried to set up a two factor (user/pass and certificate) VPN connection using some tutorials from the Internet. Unfortunately these tutorials are no longer up-to-date, so I would like to describe here how it works! In using OPNSense v20.8.
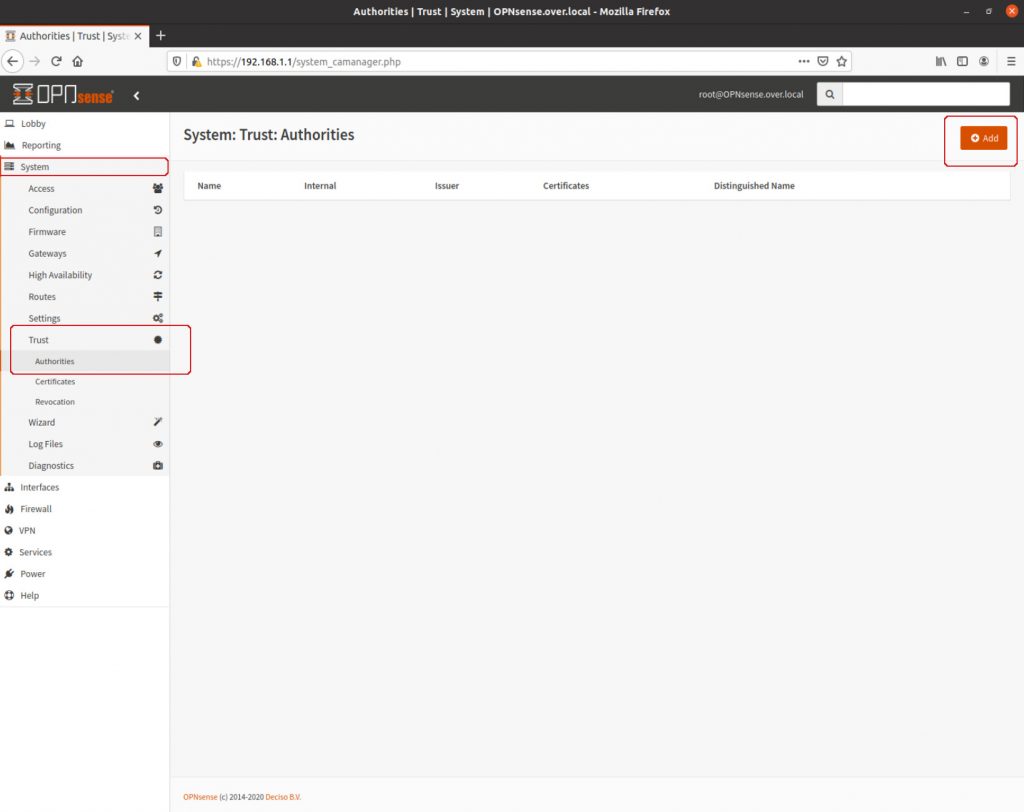
First we need a certification authority for our own certificates, which we will create. To do this, log in to OPNSense and click on “System –> Trust –> Authorities“. Now click on the “Add” in the upper right corner and we can create a new certificate authority!
Let’s add the following:
| Setting | Value | Description |
| Descriptive name | OPN Authority | |
| Method | Create an internal Certificate Authority | |
| Key Type | RSA | |
| Key length (bits) | 4096 | |
| Digest Algorithm | SHA512 | |
| Lifetime (days) | 825 | |
| Country Code | <your country code> | |
| State or Province | <your state province> | |
| City | <your city> | |
| Organization | <your organization> | |
| Email Address | <your email address> | |
| Common Name | OPN internal-ca |
Well done! With our own certification authority we can now issue certificates! You should now see something similar on the screen:

Then we let our new certification authority issue a certificate for our server right away! Via “System–>Trust–>Certificates” you should already see a certificate; the one for the WebGUI. Now click on “Add” to add a new one…
Perfect…. now we need to add a lot of data to generate our server certificate:
| Setting | Value | Description |
| Method | Create an internal Certificate | |
| Descriptive name | VPN Server Certificate | |
| Certificate authority | OPN Authority | |
| Type | Server Certificate | |
| Key Type | RSA | |
| Key length (bits) | 4096 | |
| Digest Algorithm | SHA512 | |
| Lifetime (days) | 825 | |
| Private key location | Save on this firewall | |
| Country Code | <your country code> | |
| State or Province | <your state province> | |
| City | <your city> | |
| Organization | <your organization> | |
| Email Address | <your e-mail address> | |
| Common Name | VPN Server Certificate | |
| Alternative Names | Don’t touch! |
After saving, it should look like this:
Ok perfect. Now let’s add an user to OPNSense for VPN use. Go to “System–>Access->Users” and click “Add” in the upper right corner. This is a two-step process, so read carefully!

| Setting | Value | Description |
| Disable | Unchecked | |
| Username | <your preferred username> | “Manni” in my example |
| Password | <the password for the user> | |
| Generate a scrambled password to prevent local database logins for this user | Unchecked | |
| Full name | <full user name> | |
| <users email address> | ||
| Comment | ||
| Preferred landing page | <leave empty> | |
| Language | Default | |
| Login shell | /sbin/nologin | |
| Expiration date | <leave empty> | |
| Group Memberships | <don’t change> | |
| Certificate | Checked -> Click to create a user certificate | |
| OPT seed | <leave empty> | |
| Authorized keys | <leave empty> | |
| IPsec Pre-Shared Key | <leave empty> |
After clicking “Save“, a new prompt appears:
After changing the method to “Create an internal Certificate“, we need to add some data:
| Setting | Value | Description |
| Method | Create an internal Certificate | |
| Descriptive name | <leave default> | “Manni” in my example |
| Certificate authority | OPN Authority | The authority we’ve created in the first step |
| Type | Client Certificate | |
| Key Type | RSA | |
| Key length (bits) | 4096 | |
| Digest Algorithm | SHA512 | |
| Lifetime (days) | 825 | |
| Private key location | Save on this firewall | |
| Country Code | <users country code> | |
| State or Province | <users state province> | |
| City | <users city> | |
| Organization | <users organization> | |
| Email Address | <users email address> | |
| Common Name | <leave default> | “Manni” in my example |
| Alternative Names | <don’t change anything> |
After saving, you come back to the first prompt. Now you’ll find the new certificate in “User Certificates”:

On the bottom click “Save and go back” and you’ll see all users again including “Manni”.
We’re half way through! Grab a coffee or/and some candy and move on installing the SSL server!
Go to “VPN–>OpenVPN–>Servers” and click “Add” in the top right corner.
Leave default settings except of:
| Setting | Value | Description |
| Description | SSL VPN Server | |
| Server Mode | Remote Access (SSL/TLS + User Auth) | |
| Backend for authentication | Local Database | |
| Interface | WAN | |
| Server Certificate | VPN Server Certificate (OPN Authority) | |
| DH Parameters Length | 4096 bit | |
| Encryption algorithm | AES-256-CBC (256-bit key, 128-bit block) | |
| Auth Digest Algorithm | SHA512 (512-bit) | |
| IPv4 Tunnel Network | <choose an ip subnet> | choose one that is not used eg: 172.22.32.0/24 |
| IPv4 Local Network | <your local network> | eg: 192.168.1.0/24 |
| Disable IPv6 | Checked |
After clicking “Save” you’ll see your server is up and running:

At this point we need to configure the firewall…
- to allow incoming traffic on port 1194 from the WAN interface
- the local network can be reached from the new subnet
Ok, ok.. the last step: exporting the configuration!
Go to “VPN–>OpenVPN–>Client Export” and select the newly created VPN Server from the list.
| Setting | Value | Description |
| Remote Access Server | SSL VPN Server UDP:1194 | The one we have just created |
| Export type | File Only | Because our client will be an Android client, all certificates need to be inline! |
| Hostname | <your ip or hostname> | Could be your public static ip or your DynDNS domain name. |
| Port | 1194 | |
| Use random local port | Check | |
| Validate server subject | Check | |
| Windows Certificate System Store | Uncheck | |
| Disable password save | Uncheck | |
| Custom config | <leave empty> |
You should also see two certificates on the bottom of the page which can be exported. Choose the “Manni” certificate and click the download button on the right.

You’ll get and *.ovpn file. Just import this in any OpenVPN App on your Android phone and you’re good to go! You can now connect to the OPNSense appliance with “Manni’s” username and password!

Hallo, ich habe die Schritte befolgt und OpenVPN Connect Verbindung erfolgreich, aber ich kann nicht auf meine lokalen Geräte zugreifen und wenn ich Webseiten öffne zeigt der Connect Client auch keinen Ausschlag an Traffic aus, was mich vermuten lässt das keinerlei Traffic durch den Tunnel geht. Ich habe jetzt schon echt viel im Internet geguckt, aber keinerlei Lösung gefunden. Vielleicht hast du ja eine Idee woran das liegt, bzw. wie man das Problem löst.